Here we will look at some examples of using the engine when developing interfaces for desktop applications.
29 March 2021
#desktop #sciter #ux_ui
Reading time: 7 min
Sciter is an engine that allows you to create modern interfaces with a small investment of effort and time, thanks to the use of well-known web technologies such as HTML, CSS and scripts (TIScript), very similar to Javascript.
There are examples of "Hello, World" implementation on the site of the project itself, so let's make something a little more complicated. Let's add a custom checkbox component that will take in the label and state (checked / not checked). Let's consider a couple of options for how this can be done.
First option
First, we need the files main.htm, main.css, main.tis and checkbox.tis. Let's create them in any convenient folder and open them in our favorite editor.
Now, in the checkbox.tis file, add the following code:
Now we will make the basic markup in the main.htm file and include our styles and script there, which we will write in the next step.
<html>
<head>
<title>Hello</title>
<style src="main.css" />
<script src="main.tis" />
</head>
<body>
</body>
</html>
And here is the script (main.tis):
First we import the checkbox component, then add it to the end of the body.
You should be careful with the name of the passed attributes, because if you call nameInput just name, then it will be applied to the created div (in which the checkbox is nested) and nothing will work.
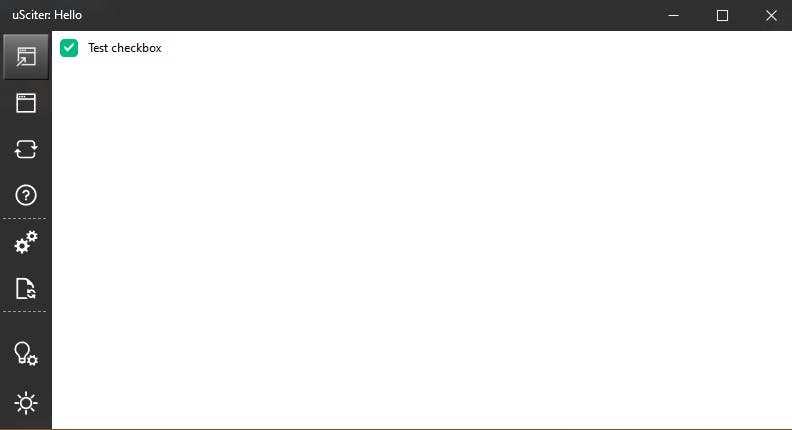
To see what we've got, let's run usciter.js. In the upper left corner there is a button that will open our htm file.
Open the file and see the checkbox.
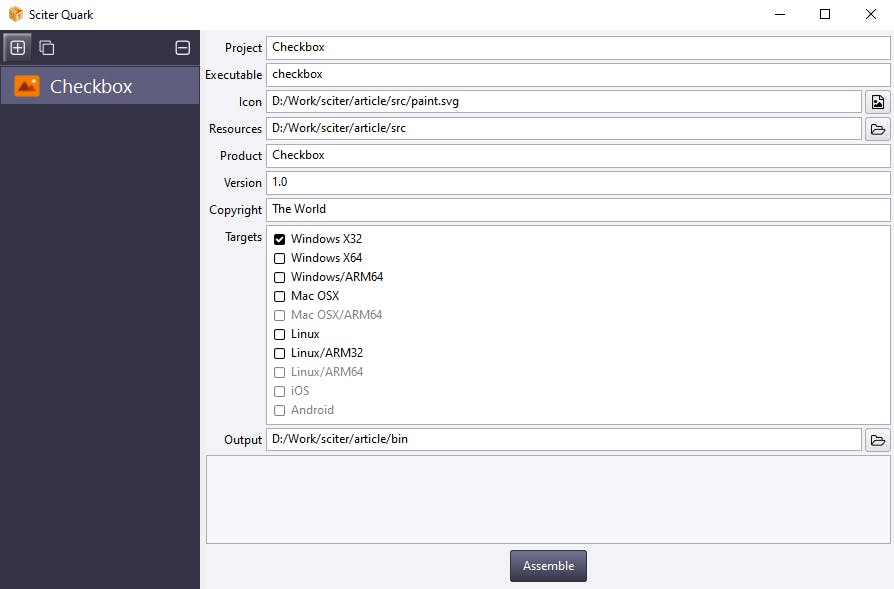
Another way to build a project is to use SciterQuark. Let's try this.
Now we need to change the folder structure a bit. In the folder where main.htm, main.tis and other files created earlier are located, you need to create two more folders: src and bin. Next, we move all our previously created files to the src folder.
And one more preparatory step: add some svg-image, which will serve as an icon, there, in the src folder.
Now open quark.bat and fill in all the fields like this:
Finally, click the Assemble button. Now our project will be located in the bin folder. Next, we find the .exe file (it will be nested in a couple of folders). We start and see the same result as when we started usciter.
Now you can figure out how to add the same checkbox in a different way.
Create a checkboxClass.tis file next to the rest of our files and put the following code in it:
And in the css file, we define an element that will be an instance of the previously created class:
checkboxClass {
prototype: CheckboxClass url(checkboxClass.tis);
display: block;
margin-bottom: 20dip;
}
It remains only to add the checkbox element to the main.htm file:
<html>
<head>
<title>Hello</title>
<style src="main.css" />
<script src="main.tis" />
</head>
<body>
<checkboxClass nameInput="label-3" label="Checkbox by class" />
</body>
</html>
Now let's run usciter.exe and find two identical-looking checkboxes.
What about debugging? Sciter provides this opportunity.
The supplied SDK has an inspector that can be used to view the DOM, styles, and breakpoints for scripts.
Let's see how it works for Windows.
We run our application in wsciter.exe (it is located in the bin.win/x64 folder), because breakpoints do not work in usciter for some reason, but you can see the DOM and styles there. In parallel, run the inspector.exe file (from the bin.win/x32 folder).
In the inspector window there is a keyboard shortcut that must be pressed in the wsciter.exe window (for windows: CTRL + SHIFT + I). Click and see the following picture.
At the top you can see the Sources and DOM tabs. The DOM tab contains the markup (specifically ours, without taking into account the usciter markup, is located in the first frame, you can expand it and see our two checkboxes).
When you select a specific element, the styles that are applied to it will be displayed on the right (like in a browser).
In the Sources tab, you can see all our files with scripts, images, styles, markup, etc. Let's open the scripts tab, select our main.tis script and put a breakpoint there (by double-clicking next to the required line).
Now let's update our application in wsciter, either by clicking on the left in the wsciter interface, or by pressing F5. The tab on the right (in the inspector) will contain the values of the variables.
The inspector also allows you to log values to the console using the debug log () function. Let's add the output, for example, to the checkbox.tis file (variables are indicated in curly braces):
Let's update the application in wsciter, and we will see the following log in the inspector's console:
This inspector is, of course, somewhat stripped down compared to the browser one, but nevertheless useful enough for debugging.
Not all Sciter features are covered here. More details about it can be found on the official website, as well as on the forum of this project.